Not so fully featured
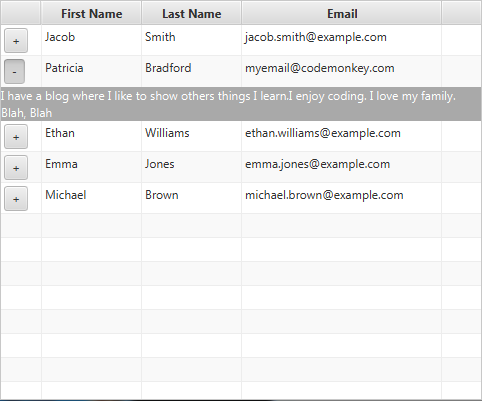
WPF tables offer a nice feature for showing a row "details" that is not supported in Java (Swing or FX). Someone recently asked me if it was possible to implement something similar in Java FX. After a lot of Google searches I realized there is nothing out there in the community to accomplish anything even remotely like this. You know what that means right? I HAD to do it. Uncharted territory is so much fun!
Included Files
package: codemonkeycorner.expandabletablerows
IExpandableTableRow - we need some extra properties to provide this functionality
AbstractExpandableTableRow - Our new Row (You have to provide the expanded content)
ExpandableTableRowSkin - How we actually layout the row / expanded content
package: codemonkeycorner.expandabletablerows.example
Person - example data
PersonRow (extends AbstractExpandableTableRow) - provides content for the details viewTestRunner - Creates an example table using the person data and row
Example in Action .....
Not quite so fast.....
To be honest I thought I had solved this issue really quickly without much hassle, right up until I hit the sort button on a column. Thats when I realized that the rows are reused when you sort, the data associated with the rows changes. This is great for performance but caused a real headache for the expanding rows. That meant I could not keep the expanded state of a row local. There had to be some external keeper (the data itself in my example) to store that data. That also meant every time the item changed I needed to update the layout as well for size and content. It IS all complete now however due this problem I am still not entirely happy with the results. My original solution was a bit more clear cut and had better separation of concerns.
How much of a difference is there in styling FX over Swing? Taking a particular look and feel and implementing it in one over the other, which one would be faster?
I had to do some exercises for work to show some information on these topics. I thought I would share a snippet of that here to demonstrate the difference. I had a specific look and feel to implement, and so chose some of those components to show. Here is one example, a button with rounded corners (all names and colors have been changed to protect the innocent)
JavaFX - Button Style
/**
 *
 * @author Patricia Bradford, www.CodeMonkeyCorner.com
 */
.root {
    -gradientColor:rgb(205, 250, 7);
    -forecolor:rgb(200,200,200);
    -backcolor:rgb(85,85,85);
}
.button{
    -fx-background-color:-backcolor;
    -fx-text-fill:-forecolor;
    -fx-background-radius: 8;
    -fx-background-insets: 1;
    -fx-border-color:-forecolor;
    -fx-border-radius: 8;
    -fx-border-width:1;
    -fx-padding: 3 15 3 15;
}
.button:hover{
    -fx-background-color: linear-gradient(from 0% 0% to 100% 100%, -gradientColor, derive(-gradientColor, 90%));
}
.button:pressed{
    -fx-text-fill:-backcolor;
    -fx-background-color:-forecolor;
    -fx-border-color:-backcolor;
}
Swing - ButtonUI
/**
 *
 * @author Patricia Bradford, www.CodeMonkeyCorner.com
 */
public class RoundedButtonUI extends BasicButtonUI {

    private static final float arcwidth = 16.0f;
    private static final float archeight = 16.0f;

    protected final Color fc = new Color(205, 250, 7);
    protected final Color ac = new Color(150, 229, 76);

    protected Shape shape;
    protected Shape border;
    protected Shape base;

    @Override
    protected void installDefaults(AbstractButton b) {
    UIManager.put("Button.background", new Color(85,85,85));
    UIManager.put("Button.foreground", new Color(200,200,200));
        super.installDefaults(b);
        b.setContentAreaFilled(false);
        b.setOpaque(false);
        b.setBorderPainted(false);
        initShape(b);
    }

    @Override
    public void paint(Graphics g, JComponent c) {
        Graphics2D g2 = (Graphics2D) g;
        AbstractButton b = (AbstractButton) c;
        ButtonModel model = b.getModel();
        initShape(b);
    //ContentArea
        g2.setRenderingHint(RenderingHints.KEY_ANTIALIASING,
                RenderingHints.VALUE_ANTIALIAS_OFF);
        if (model.isArmed()) {
            g2.setColor(c.getBackground());
            g2.fill(shape);
        } else if (b.isRolloverEnabled() && model.isRollover()) {
            paintFocusAndRollover(g2, c, fc);
        } else if (b.hasFocus()) {
            paintFocusAndRollover(g2, c, fc);
        } else {
            g2.setColor(c.getBackground());
            g2.fill(shape);
        }
    //Border
        g2.setPaint(c.getForeground());
        g2.draw(shape);
        g2.setColor(c.getBackground());
        g2.setRenderingHint(RenderingHints.KEY_ANTIALIASING,
                RenderingHints.VALUE_ANTIALIAS_OFF);
        super.paint(g2, c);
    }

    private void initShape(JComponent c) {
        if (!c.getBounds().equals(base)) {
            base = c.getBounds();
            shape = new RoundRectangle2D.Float(0, 0, c.getWidth() - 1, c.getHeight() - 1,
                    arcwidth, archeight);
        }
    }

    private void paintFocusAndRollover(Graphics2D g2, JComponent c, Color color) {
        g2.setPaint(new GradientPaint(0, 0, color, c.getWidth() - 1, c.getHeight() - 1,
                color.brighter(), true));
        g2.fill(shape);
    }

    @Override
    protected void paintText(Graphics g, AbstractButton b, Rectangle textRect, String text) {
        ButtonModel model = b.getModel();
        FontMetrics fm = SwingUtilities2.getFontMetrics(b, g);
        int mnemonicIndex = b.getDisplayedMnemonicIndex();

        /* Draw the Text */
        if(model.isEnabled()) {
            /*** paint the text normally */
            if(model.isPressed())
                g.setColor(b.getBackground());
            else
                g.setColor(b.getForeground());
            SwingUtilities2.drawStringUnderlineCharAt(b, g,text, mnemonicIndex,
                                          textRect.x + getTextShiftOffset(),
                                          textRect.y + fm.getAscent() + getTextShiftOffset());
        }
        else {
            /*** paint the text disabled ***/
            g.setColor(b.getBackground().brighter());
            SwingUtilities2.drawStringUnderlineCharAt(b, g,text, mnemonicIndex,
                                          textRect.x, textRect.y + fm.getAscent());
            g.setColor(b.getBackground().darker());
            SwingUtilities2.drawStringUnderlineCharAt(b, g,text, mnemonicIndex,
                                          textRect.x - 1, textRect.y + fm.getAscent() - 1);
        }
    }

    @Override
    protected void paintButtonPressed(Graphics g, AbstractButton c) {
        Graphics2D g2 = (Graphics2D) g;
        ButtonModel model = c.getModel();
    //ContentArea
        g2.setRenderingHint(RenderingHints.KEY_ANTIALIASING,
                RenderingHints.VALUE_ANTIALIAS_OFF);
        g2.setColor(c.getForeground());
        g2.fill(shape);
    //Border
        g2.setPaint(c.getBackground());
        g2.draw(shape);
        g2.setRenderingHint(RenderingHints.KEY_ANTIALIASING,
                RenderingHints.VALUE_ANTIALIAS_OFF);

    }
}
I could spend a few paragraphs talking about how the FX version is simple and clear; easy to see what is going on. I could tell you that the swing version is not; that it requires either knowledge of Swings 2D rendering/painting/utilties or digging through the base UI element code to determine how its done. However, I think anyone who looks at the two versions can determine all they need to know all by themselves.....
Window Z Order
I have seen quite a few requests for this functionality. It can be frustrating that swings implementation almost forces you to use a single window due to lack of "z order" control for multiple windows. In truth its not so much an MDI interface (since we can achieve that through the use of JInternalFrame), but more that we want to be able to have a window hierarchy to keep windows in a particular Z order.
Why?
Almost every single time I have seen this question asked, I have also seen people criticize the querier about it. I find it strange but I often see this happen when we do not know a solution. A very quick example would be you need a toolbar above your display. You obviously dont want your tools disappearing behind it when you click on the main window. You could accomplish this with JInternalFrame, however if you want to be able to drag the toolbar to say a different monitor that will not work. Now technically Java already provides this to a point, specifically with (J)Dialogs as children of a window. The problem arises when you need multiple layers of windows rather than just one.
A (not perfect) Solution
I have a simple library to accomplish this, however it does have limitations. Specifically there will be "flicker" sometimes when clicking on a different window. This is greatly reduced if you use undecorated windows; the flicker you are seeing is related to the activation of windows that is happening behind the scenes. This will also work for JavaFX since you can use a JFXPanel inside of the windows.
Download
How to use the library
Using the IJavaSwingMDIManager interface you can create your Z layers and child windows. It is recommended that you use the ZParent and ZChild windows provided in the library but you can provide your own windows if you desire. A quick overview of some of the methods:
Creating a manager:
There are several calls to create a new manager (createManager(...)). They all use some variation of these parameters:
- basewindow: You can provide the bottom most layer window or let the system create it for you
- z-layers: You can specify how many layers to create
- dialogCreator: You can specify your own methods to create the child and parent windows if you desire
Creating child windows
Automatically:
- createChildWindow: creates a window on the z level that you specify
Manually
- getZParent: Gets the parent window for a particular z level
- registerChildren: Register listeners on a child window
To manually create a child you will need to create the JDialog with the owner set as the parent of the Z level you want. You will then need to register that child with the service.
JDialog myDialog = new JDialog(mdiService.getZParent(0));
mdiService.registerChildren(myDialog);
I recommend you use the automatic method; you can specify the dialog creator if you just need to change the way the dialogs look or otherwise need access to the windows.
Creating a layered workspace:
    public static void main(String[] args)
    {
        JFrame frame = new JFrame();
        frame.setSize(new Dimension(800,800));
        frame.setTitle("Base Window");
        frame.setDefaultCloseOperation(JFrame.EXIT_ON_CLOSE);
        frame.setVisible(true);

        IJavaSwingMDIManager mdiInterface = new WindowManager(frame,3);

        JDialog dialog = mdiInterface.createChildWindow(0);
        dialog.getContentPane().add(new JLabel("Child of Z 0"));
        dialog.pack();
        dialog.setVisible(true);

        dialog = mdiInterface.createChildWindow(1);
        dialog.getContentPane().add(new JLabel("Child of Z 1"));
        dialog.pack();
        dialog.setVisible(true);

        dialog = mdiInterface.createChildWindow(1);
        dialog.getContentPane().add(new JLabel("Child of Z 1"));
        dialog.pack();
        dialog.setVisible(true);

        dialog = mdiInterface.createChildWindow(2);
        dialog.getContentPane().add(new JLabel("Child of Z 2"));
        dialog.pack();
        dialog.setVisible(true);
    }
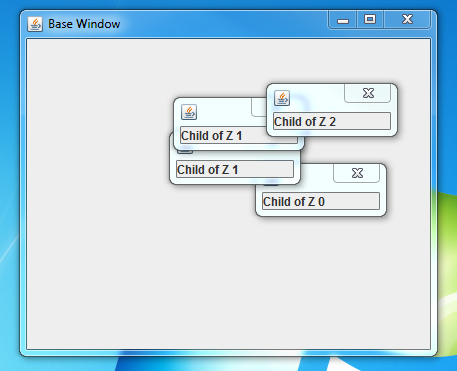
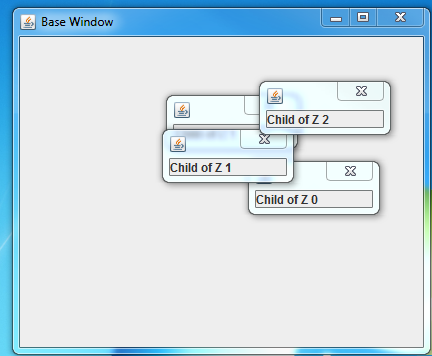
Children of a higher z order cannot go below children of a lower z order; children of the same z order can.
Enjoy!
Patricia Bradford
In a circle .....
A common request I see is for a layout that positions its children in a circle.
CircleLayout.java (5.5KB) accomplishes this by extending JavaFX's Pane layout. Here is a quick walkthrough of its highlights.
Important Properties
    /**
     * Stop Angle: The angle to layout the last child.
     */
    public DoubleProperty stopAngleProperty();
    public double getStopAngle();
    public void setStopAngle(double value);

    /**
     * Start Angle: The angle to layout the first child. Default is 0 (top center)
     */
    public DoubleProperty startAngleProperty();
    public double getStartAngle();
    public void setStartAngle(double value);

    /**
     * Inner radius: Layout will position the children in the outer ring
     * of the circle. (Halfway between the inner radius and outer radius)
     */
    public DoubleProperty innerRadiusProperty();
    public double getInnerRadius();
    public void setInnerRadius(double value);

    /**
     * Gets the outer radius of the circle. This is either the width or height
     * whichever is smaller.
     * @return radius
     */
    public double getOuterRadius();
These allow you to layout the children in an arc around the circle starting and ending at any point along the circle.
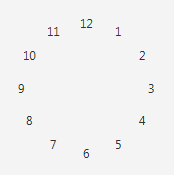
For instance if i wanted to create a clock I might do something like this...
   CircleLayout layout = new CircleLayout(100);
   layout.getChildren().addAll(
               new Label("12"),new Label("1"),new Label("2"),
               new Label("3"),new Label("4"),new Label("5"),
               new Label("6"),new Label("7"),new Label("8"),
               new Label("9"),new Label("10"),new Label("11"));
Which looks like .....
Or you could also produce the same results with this
   CircleLayout layout = new CircleLayout(100);
   layout.setStartAngle(30);
   for(int i =1;i<13;i++)
   {
       layout.getChildren().add(new Label(i+""));
   }
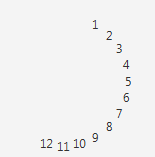
By default, If you do not set a stop angle, the layout will do a full circle. However it does support layout in a specific arc such as
   CircleLayout layout = new CircleLayout(100);
   layout.setStartAngle(30);
   layout.setStopAngle(120);
   for(int i =1;i<13;i++)
   {
       layout.getChildren().add(new Label(i+""));
   }
Which produces this:
The layout also dynamically updates for certain changes such as:
Child size changes
Children added/removed
Layout size changes
Stop/Start angle changed
Inner radius changed
Enjoy!