Window Z Order
I have seen quite a few requests for this functionality. It can be frustrating that swings implementation almost forces you to use a single window due to lack of "z order" control for multiple windows. In truth its not so much an MDI interface (since we can achieve that through the use of JInternalFrame), but more that we want to be able to have a window hierarchy to keep windows in a particular Z order.
Why?
Almost every single time I have seen this question asked, I have also seen people criticize the querier about it. I find it strange but I often see this happen when we do not know a solution. A very quick example would be you need a toolbar above your display. You obviously dont want your tools disappearing behind it when you click on the main window. You could accomplish this with JInternalFrame, however if you want to be able to drag the toolbar to say a different monitor that will not work. Now technically Java already provides this to a point, specifically with (J)Dialogs as children of a window. The problem arises when you need multiple layers of windows rather than just one.
A (not perfect) Solution
I have a simple library to accomplish this, however it does have limitations. Specifically there will be "flicker" sometimes when clicking on a different window. This is greatly reduced if you use undecorated windows; the flicker you are seeing is related to the activation of windows that is happening behind the scenes. This will also work for JavaFX since you can use a JFXPanel inside of the windows.
Download
How to use the library
Using the IJavaSwingMDIManager interface you can create your Z layers and child windows. It is recommended that you use the ZParent and ZChild windows provided in the library but you can provide your own windows if you desire. A quick overview of some of the methods:
Creating a manager:
There are several calls to create a new manager (createManager(...)). They all use some variation of these parameters:
- basewindow: You can provide the bottom most layer window or let the system create it for you
- z-layers: You can specify how many layers to create
- dialogCreator: You can specify your own methods to create the child and parent windows if you desire
Creating child windows
Automatically:
- createChildWindow: creates a window on the z level that you specify
Manually
- getZParent: Gets the parent window for a particular z level
- registerChildren: Register listeners on a child window
To manually create a child you will need to create the JDialog with the owner set as the parent of the Z level you want. You will then need to register that child with the service.
JDialog myDialog = new JDialog(mdiService.getZParent(0));
mdiService.registerChildren(myDialog);
I recommend you use the automatic method; you can specify the dialog creator if you just need to change the way the dialogs look or otherwise need access to the windows.
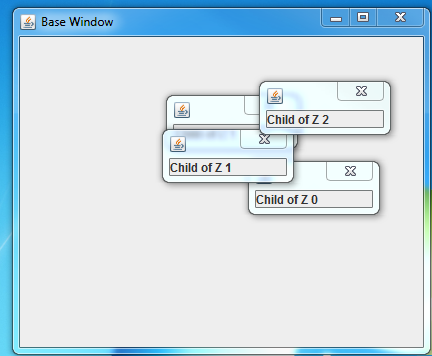
Creating a layered workspace:
    public static void main(String[] args)
    {
        JFrame frame = new JFrame();
        frame.setSize(new Dimension(800,800));
        frame.setTitle("Base Window");
        frame.setDefaultCloseOperation(JFrame.EXIT_ON_CLOSE);
        frame.setVisible(true);

        IJavaSwingMDIManager mdiInterface = new WindowManager(frame,3);

        JDialog dialog = mdiInterface.createChildWindow(0);
        dialog.getContentPane().add(new JLabel("Child of Z 0"));
        dialog.pack();
        dialog.setVisible(true);

        dialog = mdiInterface.createChildWindow(1);
        dialog.getContentPane().add(new JLabel("Child of Z 1"));
        dialog.pack();
        dialog.setVisible(true);

        dialog = mdiInterface.createChildWindow(1);
        dialog.getContentPane().add(new JLabel("Child of Z 1"));
        dialog.pack();
        dialog.setVisible(true);

        dialog = mdiInterface.createChildWindow(2);
        dialog.getContentPane().add(new JLabel("Child of Z 2"));
        dialog.pack();
        dialog.setVisible(true);
    }
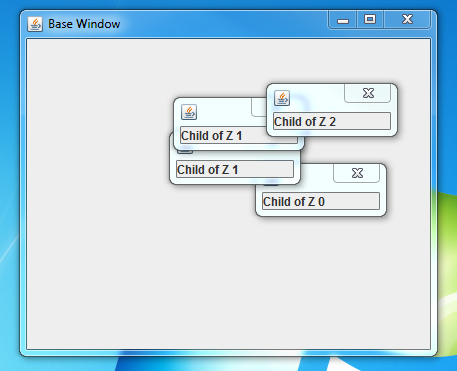
Children of a higher z order cannot go below children of a lower z order; children of the same z order can.
Enjoy!
Patricia Bradford
Distinguishing between wants and needs
If you are doing WPF development you will not get very far before running into this decision. Should you use DependencyObject(and DependencyProperty) or should you implement INotifyPropertyChanged to support binding. This question boils down into two really. When do you "need" to use one or the other, and when might you "want" to choose one over the other.
So when do we need to use DependencyObject?
<MyControl MyDependencyProperty="{Binding PropertyPath}" />
The only time you must use a DependencyObject is when you want someone to be able to make it the target of a binding expression. Typically (though not always) this is only the case if you have created a custom control with properties that you want to be bindable rather than as a view model. This is the one case where you cannot use INotifyPropertyChanged.
So when do we need to use INotifyPropertyChanged?
- If your object/property needs to implement a custom Equals/Hashcode.
DependencyObject seals both Equals and GetHashCode methods, so if you need to override you must use INotifyPropertyChanged.
- If your object/property needs to be Serializable
DependencyObject is not marked as Serializable. DependencyProperty fields do not serialize correctly even if you mark them as Serializable. DependencyProperty values are not stored local to the object (if they are stored at all).
When might I want to use one over the other?
Performance (memory and speed) - DependencyObject wins
- Binding works faster with DependencyObject rather than an object that implements INotifyPropertyChanged.
- DependencyObject uses less memory than a CLR(Common Language Runtime) object.
This can be a significant difference if objects are commonly using the default values. DependencyObject uses a static field for the default, and only creates storage space for the DependencyProperty if a value is set. This is the reason a DependencyObject is not serializable.
It should be noted that in most cases you would never notice the difference. Only in cases with a very large property set, or with more real-time operations would you need the performance difference.
Multi-threaded - CLRs win
- If you are using a background thread to create your objects you might want to use CLRs instead.
DependencyObjects have thread affinity (they can only be accessed from the thread they were created on). Binding to a DependencyObject that you have created on a background thread will cause an exception.
However ....
You could dispatch your object creation to the UI thread. Keep in mind though if you are constantly having to bounce thread calls to create your objects and set values then you may be losing much of the benefit of using your background thread for processing.
Control over notification - CLRs win
- You get to decide when to send notification of changes.
This can be useful if for instance you wanted to batch multiple changes into one UI operation.
However ....
You do get other very useful mechanisms built into the DependencyObject/DependencyProperty system. Validate and Coerce callbacks are very useful in certain situations.
In conclusion....
There is no best to use for all cases. Instead you should pick the one that suits your needs. Hopefully this post has helped you to determine which one that will be!
In a circle .....
A common request I see is for a layout that positions its children in a circle.
CircleLayout.java (5.5KB) accomplishes this by extending JavaFX's Pane layout. Here is a quick walkthrough of its highlights.
Important Properties
    /**
     * Stop Angle: The angle to layout the last child.
     */
    public DoubleProperty stopAngleProperty();
    public double getStopAngle();
    public void setStopAngle(double value);

    /**
     * Start Angle: The angle to layout the first child. Default is 0 (top center)
     */
    public DoubleProperty startAngleProperty();
    public double getStartAngle();
    public void setStartAngle(double value);

    /**
     * Inner radius: Layout will position the children in the outer ring
     * of the circle. (Halfway between the inner radius and outer radius)
     */
    public DoubleProperty innerRadiusProperty();
    public double getInnerRadius();
    public void setInnerRadius(double value);

    /**
     * Gets the outer radius of the circle. This is either the width or height
     * whichever is smaller.
     * @return radius
     */
    public double getOuterRadius();
These allow you to layout the children in an arc around the circle starting and ending at any point along the circle.
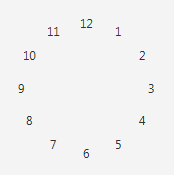
For instance if i wanted to create a clock I might do something like this...
   CircleLayout layout = new CircleLayout(100);
   layout.getChildren().addAll(
               new Label("12"),new Label("1"),new Label("2"),
               new Label("3"),new Label("4"),new Label("5"),
               new Label("6"),new Label("7"),new Label("8"),
               new Label("9"),new Label("10"),new Label("11"));
Which looks like .....
Or you could also produce the same results with this
   CircleLayout layout = new CircleLayout(100);
   layout.setStartAngle(30);
   for(int i =1;i<13;i++)
   {
       layout.getChildren().add(new Label(i+""));
   }
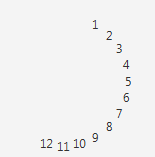
By default, If you do not set a stop angle, the layout will do a full circle. However it does support layout in a specific arc such as
   CircleLayout layout = new CircleLayout(100);
   layout.setStartAngle(30);
   layout.setStopAngle(120);
   for(int i =1;i<13;i++)
   {
       layout.getChildren().add(new Label(i+""));
   }
Which produces this:
The layout also dynamically updates for certain changes such as:
Child size changes
Children added/removed
Layout size changes
Stop/Start angle changed
Inner radius changed
Enjoy!